

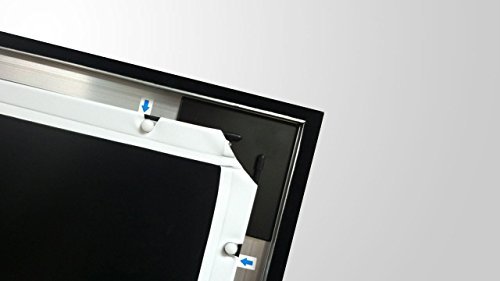


Secure top and bottom mounting brackets that allow horizontal adjustment
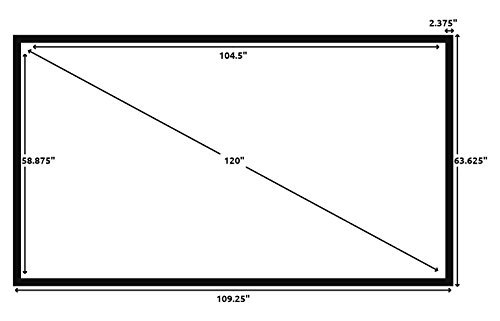
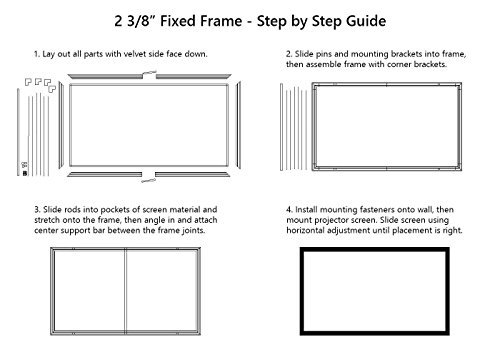
Size:16:9, 120” | Color:White Material The Silver Ticket Products Fixed Frame projection screen offers powerful performance for the price. This screen features real projection screen material, not a sheet. The material is a white stretchy, high-quality vinyl at 1.1 gain that is designed for watching movies. Wait until you see the colors! There is no resolution lost at any angle. This screen truly assembles much faster than any other brand available! Forget about tucking the screen material into the frame - the Silver Ticket Tension Rod System saves you time and frustration. How does the material connect to the frame? Each side of the material has a pocket. A rod slides through the pocket to attach to the frame. This saves you time during assembly, but also removes any puckers or wrinkles in the viewing surface. The rod holds the material perfectly square all around the whole frame. This pocket and rod system remains hidden behind the frame so you only see the movie. Forget about tricky installations - this fixed frame screen mounts on the wall much like a large picture frame. The sturdy aluminum frame is WRAPPED, not flocked, with a light absorbing black velvet fabric to absorb over-projected light so you don’t have to be a professional when aligning your projector. While other brands use square tubing in their frames, this screen is built with durable extruded aluminum that contours down to the projected image so you won’t have any ugly shadow on the image area. Join the thousands of satisfied customers – buy Silver Ticket today!
I have nothing to compare it to other than my lightly textured tan wall and boy what a difference! Assembly was easy and material was made with high quality.
Easy to install and looks amazing! Used 2x4’s behind the screen to install LED lighting.
I watched the the 5 youtube videos that silver ticket has up in order to get the assembly down. The center post gives people problems. After the screen was attached to all the clips, I released the screen from the two top/center clips and two bottom/center clips (where the center posts gets wedged in). Then, with far end of the center post in the groove of the frame, I was able to use my index fingers and thumbs to force the post and frame away from one another just enough for the end of the post to drop down into the groove. I then re-attached the screen to the top and bottom center clips.I attached two 1⁄4” hooks ($.98 from HD) and have the screen hanging in front of my plasma which is mounted to the wall behind it. I had previously had an elite B model pull down screen hanging from very strong wire through the ceiling and screwed to ceiling joists. I could no longer take all the wrinkles and waves of the pull-down screen. This screen is only about 20 lbs or so I’m guessing. It’s easy to hang without help. I just lean it against a wall in a side room when using the plasma tv behind it, which is most of the time.
Amazing product, easy to assemble.
This is a rather surprisingly good screen, for not a lot of money. I started out the search by considering a DIY approach, but after tallying the cost of materials and some tools that i didn’t have, this turned out to be about $40 cheaper, easier and quicker to set-up, and looks rather professional at the same time.I think the manufacturer did a good job packaging the item as well. Each component was either in its own box, or plastic bag. It was almost like opening a matryoshka – box inside a box inside… you get the idea. :)The relevant components were also wrapped with foam on the tips and all components, other than a screw (more in a bit), just screamed quality IMHO. The bar that connects the two halves is one solid chunk of aluminum.Each screw and such is in its own bag, which makes it easier to sort out and figure what is needed where. There was enough of every piece to build the screen, with at least one extra screw or hook left over. I’m glad there was an extra screw because one didn’t have a hole on the head lol! :DSet-up took no more than an hour, and this was with breaks. It was just so easy to build, i just can’t understand why some reviews say it’s difficult. Even stretching the screen could be done with one hand.The only time i needed help was mounting it to the wall, as it’s a fairly wide screen and you’ll need someone on the other end to lift it up.The screen material itself looks good to me, i’m no videophile so can’t really comment about gain and all that. But it’s as good as the Da-Lite (4:3) that i had prior to this. Viewing angle is pretty good, and i had to turn down my projector brightness a bit to work with this screen.Overall, a great buy for a great price and it looks rather professional too.
This is my third acoustically transparent screen…the last was a Draper AT1200 106” screen. I wanted to go bigger because my new JVC RS46u can throw a bright enough picture in 3D to make this possible. I’ve been a home theater fan for many years, and have owned a dedicated theater for well over a decade. Since the days of Laserdiscs, CRT projectors, and Dolby Surround. (You might find me on AVSForum, Emotiva Lounge, or the Polk Audio Forum as “rtart.”)As part of my constant upgrade path, I did a lot of reading online before pulling the trigger on the ST screen reviewed here so had no surprises about the assembly instructions (or lack thereof). Watching the YouTube video makes it all clear, and a little mechanical inclination makes it fairly easy to put together and mount. The biggest issue with screens is their shipping size and cost…a ten foot long box is going to cost to ship. ST makes this screen frame in sections, so the longer (top and bottom) frame sections have to be connected somehow. ST manages this issue well, with a very sturdy connector between the two sections. The frame side sections are one piece, so no middle connection is necessary. Corners go together with reinforcing brackets and screws, and are very sturdy. After joining the top and bottom halves, put the corner brackets on the top and bottom first, then connect the frame sides.I recommend adding the hanging brackets at this point, and figure out how you are going to mount the screen to the wall. Trust me, it’s easier to do if you can reach through before the fabric is installed. Once you mount the wall bracket halves onto the wall, its time to install the fabric. Pull down the frame and lay it “ugly” side up.Roll out the fabric and thread in the rods in the pockets. The shorter ones go on the top and bottom and meet in the middle. Start in with every third spring to get started, then fill in the ones that are missing. (The diagram does help a little here….the springs should clip down over the rods, and then the other end into the channel on the frame)Fabric is pulled snugly by the springs, but inserting the middle supports (there are 2 here) was easy. I installed the hanging brackets onto the frame first, and set one end against the bracket while “encouraging” the other end to the other bracket with a mallet. If you orient them correctly (see the diagram) they will go in pretty easily…but you WILL need a mallet to get it done. Don’t be shy, but you might want to wrap the mallet in a clean cloth to protect the screen surface.A few small wrinkles in the screen, but I expect them to come out in a day or two. If this is an issue, I will revisit this review.Fabric appears to indeed be 1.1 gain, as compared to my other screens and a couple of samples from other manufacturers. Acoustic performance also appears to be as good as past screens I have owned. The weave of the fabric is invisible from my viewing distance, which is around 11 feet.All things considered, this is a substantial screen that appears to have cost a LOT more than I paid. I would recommend it to anyone considering it. Took me about an hour, by myself, from opening the box to watching a movie.
Cannot complain. Works perfectly, easy enough to assemble (will likely take you over an hour if it’s your first time, less if you have help), works great.
Huge! Screen is fantastic. Putting together is a breeze. Don’t be to scared to pull the screen to get it to form. Looks spectacular.
Use hammer on installation of center pole (YouTube helped)
This is a wonderful screen, in my case I got a Optoma H26 and the improvement is notorious, the colors are more intense, i recommend this product 100%
Amazing kit. Easy to assemble. Looks clean and professional.
It’s the deal. Thought about paint then found this. Perfect solution.
Second one I have purchased…Enough said.
Incredible value! Easy to assemble, easy to hang, and looks better than I imagined.
This Projector Sreen is Way better than my previous pull down model!The light reflection of images is incredible.
comments powered by Disqusgreat product! would definitely recommend!